---
title: 'Webpage in the Homelab'
url: 'https://gerfficient.com/en/home/homelab-webpage'
markdown: 'https://gerfficient.com/en/home/homelab-webpage.md'
lang: en
date: '2024-11-23'
description: 'Website in the Homelab There are a number of providers that allow you to put your own website online. The components required for this (domain, web server and the link between the two) are then managed and configured by the provider. This saves time, but it also means that all data is stored on thi…'
---
# Webpage in the Homelab
### 23. Nov. 2024
## Website in the Homelab
There are a number of providers that allow you to put your own website online. The components required for this (domain, web server and the link between the two) are then managed and configured by the provider. This saves time, but it also means that all data is stored on third-party hardware.
In this article, I explain how to use [Docker](https://www.docker.com) containers to run your own web server and how to put it online using [Cloudflare](https://www.cloudflare.com/). To ensure that the website is permanently online, it is recommended that you follow these steps on a home server (i.e. a PC that is permanently running). This can be a low-power computer like the Raspberry Pi or a full-fledged rack server with an Intel or AMD CPU.
For testing purposes, the web server can also be set up on a normal computer. However, the website will no longer be available as soon as the computer is disconnected from the Internet.
### Docker
Setting up Docker is pretty much self-explanatory. How to install [Docker Desktop](https://docs.docker.com/desktop/) or (only) [Docker Engine](https://docs.docker.com/engine/install/) is described at these two links.
On macOS, you can also use Homebrew to install Docker Desktop:
```bash
brew install --cask docker
```
Once Docker is started, everything is ready to set up a web server.
### Webserver Container
There are various servers that can serve a website. Servers like *Ngnix* or *Apache* are well known and widely used for this purpose. But to simply provide a static website, these servers are – as one would say in technical jargon – *overkill*. Therefore, I use a server called *httpd* in the container *busybox* – probably the smallest server for static websites.
For testing purposes, create an empty folder and save a file named `index.html` inside it. This file should have the following content:
```html
Test
Hello, world!
```
Now the container can be started with the command `docker` as follows:
```bash
docker run \
-d \
--rm \
-p 8080:80 \
-v /path/to/folder:/www \
busybox \
/bin/sh -c 'cd /www; busybox httpd -f -v -p 80'
```
The command is split into different lines so that it can be explained more easily:
- `docker run` is the basic command used to start a Docker container.
- `-d` indicates that the container should be started in *detached mode*.
- `--rm` indicates that the container should be deleted when it has been stopped.
- `-p 8080:80` specifies that port 8080 of the host (running the Docker container) should be connected to port 80 in the container (i.e. the web server).
- `-v /path/to/folder:/www` specifies that the path to the folder where the file `index.html` is stored should be mounted in the container with the directory `/www` as a volume. You can also enter the current working folder using `$PWD`, e.g. if you have switched to the said folder by entering the command.
- `busybox` is the name of the Docker image to be started as a container.
- `/bin/sh -c 'cd /www; busybox httpd -f -v -p 80'` is the start argument that is passed to the container. It is a bit nested but not complex in itself:
- `/bin/sh` starts a shell environment.
- `-c` indicates that the subsequent code (in `'...') should be executed by the shell environment.
- The code `'cd /www; busybox httpd -f -v -p 80'` first changes to the folder `/www` using `cd` and then starts the web server on port 80 using `busybox httpd -f -v -p 80`.
At the address `http://127.0.0.1:8080/`, the familiar *Hello, world!* should now be displayed in the browser.
So far so good. However, this web server is not yet connected to the internet. To do that, a domain and Cloudflare must be set up.
### Cloudflare Container
To access the web server via the internet, you first need an account with Cloudflare. Creating one is free. Now you have to register your domain with Coudflare. There is also a free option for doing this:
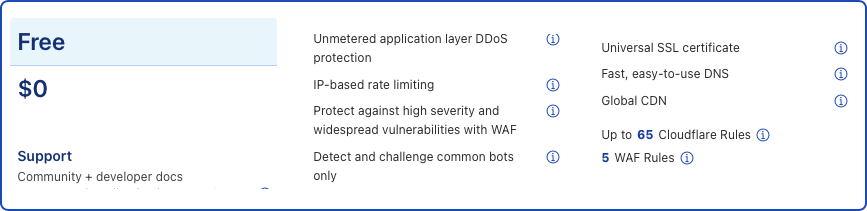
Now the nameservers at the registrar (such as Ionos, Godaddy etc.) have to be updated to activate Cloudflare's services for the domain. These nameservers usually have the following naming structure: `*.ns.cloudflare.com`. Once the change has been applied at the registrar, you are ready to go.
In the Cloudflare *Zero Trust* menu, you can set up a *Cloudflared* tunnel in the *Networks* tab. As you click through the setup, you will end up with a selection of how to set up the tunnel for different environments. For Docker, a command like the following is then displayed:
```bash
docker run cloudflare/cloudflared:latest tunnel --no-autoupdate run --token xxxxxx....
```
The token is automatically generated and is unique for each tunnel.
To ensure that the container runs independently and is deleted after it has finished, it is recommended that you add the additions `-d` and `--rm`. The command is split across several lines below to make it easier to read, and the token is not passed as part of the start command, but as an environment variable (which is said to be more secure):
```bash
docker run \
-d \
--rm \
cloudflare/cloudflared:latest \
-e TUNNEL_TOKEN=xxxxxx.... \
tunnel --no-autoupdate run
```
When the command is executed in this way, a container is started that connects to Cloudflare and creates an encrypted tunnel. The tunnel allows Cloudflare to forward web requests to the registered domain over the tunnel to a specific endpoint in the home network. This means that communication can be targeted to servers in the home network via Cloudflare. To do this, you can now register public hostnames (domains and subdomains) in the tunnel's menu and connect them to the server's address.
For example, if the computer on which the previously set up web server is running in the container has the IP address `192.168.1.2`, you can connect the service to a host name at Cloudflare via `http://192.168.1.2:8080`.
However, this is only of limited use if the IP address of the computer changes (e.g. due to a new assignment via DHCL). Since the Cloudflare container and the web server container are not directly connected, the IP address would then have to be updated in the tunnel. To avoid this, the two containers can be started within the same *network*.
### Docker Network
To start containers in a specific network, you first have to define a network. I'll call it `cloudflare` for simplicity:
```bash
docker network create cloudflare
```
You can now check that the network has been created:
```bash
docker network inspect cloudflare
```
And you should then get a result like this:
```
[
{
"Name": "cloudflare",
"Id": "xxxxx....",
"Created": "2024-11-23T18:53:29.439745922Z",
"Scope": "local",
"Driver": "bridge",
"EnableIPv6": false,
"IPAM": {
"Driver": "default",
"Options": {},
"Config": [
{
"Subnet": "172.18.0.0/16",
"Gateway": "172.18.0.1"
}
]
},
"Internal": false,
"Attachable": false,
"Ingress": false,
"ConfigFrom": {
"Network": ""
},
"ConfigOnly": false,
"Containers": {},
"Options": {},
"Labels": {}
}
]
```
Now you have to stop both containers and restart them with the addition `--network=cloudflare`. To stop the containers, you need their IDs, which you can get as follows:
```bash
docker container ls
```
which should show the following output:
```
CONTAINER ID IMAGE COMMAND CREATED STATUS PORTS NAMES
aaa... cloudflare/cloudflared:latest "cloudflared --no-au…" 5 minutes ago Up 5 minutes brave_greider
bbb... busybox "/bin/sh -c 'cd /www…" 5 minutes ago Up 5 minutes 0.0.0.0:8080->80/tcp wizardly_dhawan
```
With the following command, each container can be stopped (the ID must be replaced correspondingly):
```bash
docker container stopp
```
Both containers can now be restarted with the following commands, but in such a way that they are started in the `cloudflare` network:
```bash
docker run \
--network=cloudflare \
-d \
--rm \
-e TUNNEL_TOKEN=xxxxxx.... \
cloudflare/cloudflared:latest \
tunnel --no-autoupdate run
```
When the web server is started, it should also be given a unique name so that it is easier to identify it within the `cloudflare` network:
```bash
docker run \
--name=busybox-httpd \
--network=cloudflare \
-d \
--rm \
-p 8080:80 \
-v /path/to/folder:/www \
busybox \
/bin/sh -c 'cd /www; busybox httpd -f -v -p 80'
```
Now, instead of the IP address, you can simply specify the service in the Cloudflare tunnel menu as follows:
```
http://busybox-httpd:80
```
Because the Cloudflare container and the web server container are both running in the same network, one container can see the other and communicate with it using its name. This means that the hostname `http://busybox-httpd:80` never leaves the network of the two containers, whereas previously the request had to take a small detour via the host. Accordingly, you can also start the web server container without publishing the port with `-p 8080:80` in the home network. If you omit this addition from the start command, the web server is only accessible via the Cloudflare container, and thus only via the associated public host name. However, this makes web development a bit cumbersome, which is why I often make my containers accessible via a local port.
And this is how you can run a web server locally and reach it via the internet, which actually concludes this post.
However, creating a network and the coordinated start of two containers seems a bit cumbersome. To better coordinate this, there is a tool called Docker Compose
### Docker Compose
The command `docker compose` reads information from a YAML file called `compose.yaml` and starts several containers with specific configurations accordingly. Since the file contains information about both containers and the network, it is easier to synchronize the containers. The content of the file then looks like this:
```yaml
services:
webserver:
container_name: busybox-httpd
image: busybox
restart: unless-stopped
working_dir: /www
command: httpd -f -v -p 80
volumes:
- ./:/www
tunnel:
container_name: cloudflared-tunnel
image: cloudflare/cloudflared
restart: unless-stopped
command: tunnel --no-autoupdate run
environment:
- TUNNEL_TOKEN=xxxxxx....
networks:
default:
name: cloudflare
```
This defines two services (`webserver` and `tunnel`) and a network (`cloudflare`) that connects the two. The service specifications are the same as the containers from earlier, only instead of flags, the containers are configured with values in YAML format.
The containers are then started as follows:
```bash
docker compose up
```
You will now see an output that should contain the following:
```
...
[+] Running 2/2
✔ Container cloudflared-tunnel Created 0.2s
✔ Container busybox-httpd Created 0.2s
...
```
This means that both containers have been started. Use ctrl + c to stop the containers:
```
....
[+] Stopping 2/2
✔ Container cloudflared-tunnel Stopped 0.7s
✔ Container busybox-httpd Stopped 10.1s
...
```
If you do not want to see the output, the containers can be started in detached mode with the flag `-d`:
```bash
docker compose up -d
```
Because the key combination no longer works, they can now be stopped with the following command:
```bash
docker compose stop
```
And so we have truly reached the end of the article.
### Possible Troubleshooting
It may happen that when you restart the containers using Docker Compose, one of the containers does not connect to the network. To fix this, you can try to delete the stopped containers before restarting them:
```bash
docker compose rm
```
Alternatively, you can create the network as usual and then specify in the YAML file that an external network should be used:
```YAML
...
networks:
default:
name: cloudflare
external: true
```
---
## Navigation
- Parent: [Home](https://gerfficient.com/en/index.md)
- Previous: [Telekom and Cloudflare](https://gerfficient.com/en/home/telekom-and-cloudflare.md)
- Next: [SQLAlchemy](https://gerfficient.com/en/home/sqlalchemy.md)